12 Days of Holiday Art Projects for All to Enjoy
With all the holiday celebrations happening—Christmas, Hanukkah, Kwanzaa—kids are excited, families are busy, festivities are planned. Want to personalize the thrill of the season? Deck your halls with holiday art projects crafted by your family’s own hands. That includes adults and children, with particular focus on your toddlers and preschoolers. Imagine the pride of your two-year-old at seeing her creation hanging from the holiday tree. And check out the grin on your almost-kindergartener when his artwork greets visitors at the door. Channeling the energy of the season into imagination benefits the entire household, but don’t tell the youngsters … they’re working on their fine motor skills as they create.
12 Days of Holiday Craft Ideas
As thought-starters, here are 12 easy projects, in no particular order, for you to consider. Complete instructions and/or videos for each one can be found online, along with thousands of other suggestions for activities to pursue.
- Christmas cards. Materials = card stock (white or colored); construction paper in various colors; add-ons like stickers, stars, glitter, pompoms; glue stick and blunt-end scissors. To make, cut card stock into the desired size and fold in half. Cut shapes like Christmas trees or ornaments from construction paper and glue to the card stock. Add stickers, glitter, stars, as desired. Older kids can write a message.
- Christmas ornaments. Materials = same as above, plus yarn or string. To make, cut card stock into various shapes: ball, bell, angel, tree, candy cane, animals. Decorate with stickers, glitter, pompoms, stars. Make a small hole at the top, push yarn through to desired length, tie ends together with a knot to hang.
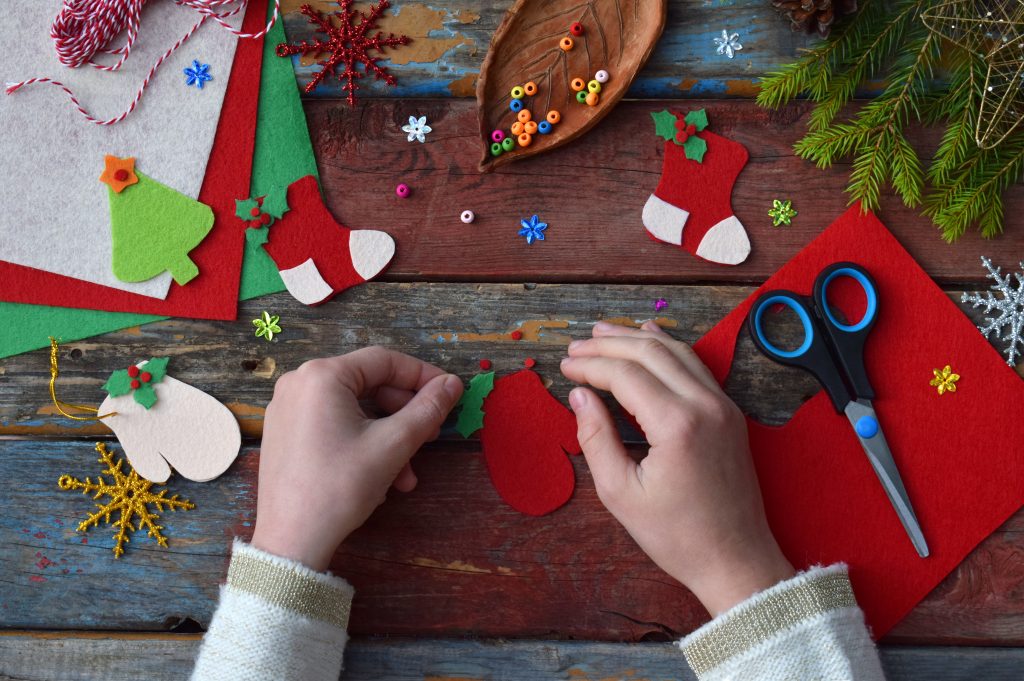
- Felt candy cane holster. Materials = any color felt; pompoms, tinsel, stars, other trim; scissors, glue stick, candy canes. To make, cut felt into shape of Christmas tree, snowperson, ball, bell, other; cut three smallish slits in back of the felt; glue pompoms, tinsel, stars to front side; slip candy cane through slits in the felt. For younger kids, a parent or sibling will need to shape the felt; older preschoolers can use a template to cut the felt themselves.
- Marshmallow snowpeople on a stick. Materials = wooden skewers, marshmallows (4 per snowperson), edible food coloring pens, rainbow strip soft candy, miniature chocolate candy cups (Reese’s or similar). To make, use food coloring pen to draw buttons on front of three marshmallows, a face on the fourth; thread the three button marshmallows onto a skewer; cut rainbow strip candy into narrower strips and thread onto skewer above marshmallows; add marshmallow head to skewer, leaving room at the top; finish with chocolate cup to make a hat.
- Plastic bottle Christmas tree. Materials = empty plastic soda bottles of various sizes, preferably green; foam stickers and stars. To make, empty and rinse bottles, screw on caps; affix stickers of all sizes to decorate the tree. That’s it—simple, easy, quick, perfect for even the youngest kids.

- Hanukkah Star of David suncatcher. Materials = wooden craft sticks (six per Star), blue tissue paper, glitter, yellow paper plate, glue stick, scissors, gold ribbon, tape. Glue three sticks together in the shape of an equilateral triangle, make two; put triangles on blue tissue paper, draw around them; cut out tissue paper triangles, glue to popsicle stick triangles, trim off excess paper; glue two triangles together to make 6-pointed Star of David shape (one triangle pointed up, the other down); put glue around the edges of triangles and cover with glitter; tape piece of gold ribbon to top of Star; cut middle out of yellow paper plate; tape Star to back of plate frame; add ribbon at top of suncatcher to hang up. This project is better for older kids since there are more steps involved.
- Painted Christmas ornaments. Materials = precut, unfinished wooden ornaments in various shapes; washable paints; pompoms, glitter, sparkles; glue stick, yarn. To make, paint ornaments in whatever colors, combinations; use glue to add trim items; thread yarn through the hole in ornament to hang.
- Frosted cookies. Materials = baked, cooled cookies in various shapes, frosting in all colors, sprinkles and candies, knife or spatula. To make, apply frosting to baked cookies, add sprinkles when frosting is wet or frosting in different colors after each layer dries. A parent or older sibling is needed to bake the cookies to be frosted.
- Colored paper chain. Materials = construction paper in various colors, glue stick. To make, cut multiple strips of paper 8 inches long x 1 inch wide, make a loop of a strip and glue ends together, place another strip through the glued loop and glue that loop together; keep gluing loops to desired length.
- Kwanzaa flag garland. Materials = red, green, black construction paper; green yarn; scissors, glue stick. To make, cut multiple strips of black paper into pieces 15 inches long x 6 inches wide, fold in half; cut multiple red and green strips 5 inches long and 6 inches wide; glue a green strip to the bottom of each black strip, place a red strip above that, trim off excess edges (finished order of each flag is black on top, red in the center, green on the bottom); cut yarn to desired length; place folded flag cards at equal distances along the yarn, glue front to back of each paper flag; hang.
- Handprint Santa. Materials = card stock paper, washable red and white paints, red and black pens, scissors. To make, paint the child’s fingers white to make Santa’s beard, and thumb and heel of hand red for hat, leave middle of the palm empty; gently press painted hand on paper to make a print, holding hand down to get a good impression and keep fingers from wiggling; wipe paint from hand and set print aside to dry; cut the handprint out; add eyes and cherry nose with pens. The Santa has lots of uses: glued to folded paper for a card, hung on the tree as an ornament, displayed on walls to add Christmas cheer.
- Pine cone reindeer. Materials = pine cones, twigs, wiggly eyes, brown felt, red pompoms, small bow, glue stick, scissors, ribbon. To make, glue pompom nose, wiggly eyes, small bow near the bottom of the pine cone; cut two small ears from felt and glue to the top of pine cone; glue two small twigs to top of cone for antlers; glue ribbon to top of cone to hang.
Handy Tips to Keep It Fun
Fun is the operative word. You want your Christmas/Hanukkah/Kwanzaa to be a happy season, filled with love and giving and remembering what’s important and special about your family and your life. To help with that, keep your holiday art projects simple and easy to complete. Your family creations are about flair and imagination, not flawless end results. Make sure activities are matched to each child’s age, skills, and interests; expecting your youngster to do something he or she can’t accomplish is a quick path to frustration for all concerned. Getting the whole family involved is a plus; older kids helping siblings gives a glow of accomplishment to all.
Above all, be sure to save and date artwork from each season. You’ll find that this year’s hand-painted ornaments and glued garlands and Santa handprints and pine cone reindeer will become treasured family heirlooms decades later on.